
One of the neat, and at the same time complicated, aspects of Wildstar are runes. For those who played WoW, think of gems, combined with enchantments. When you really start to pay attention, you can get easily overwhelmed. This Rune Guide aims to help people understand how to Rune.
The first and most basic question – is it worth it? Yes.
Even without sets, a runed item nearly doubles in power. It’s less noticeable while leveling, but once you start elder content at level 50, it makes a world of difference and is essentially mandatory.
Rune Overview
You’ll notice that some items have rune slots, linked to an element (air, earth, etc…). In each of these slots, you can insert a rune. Rune names can get really complex, but they generally break down into the following:
[Element][Quality][Type][Effect]
So you might have an Earth – Divine Rune of Critical Hit Severity.
- Elements are rather straightforward. Air, Earth, Fire, Life, Logic, and Water are the basic types.
- Helmets, Chests, Gloves and Weapons can also have a specific type of Fusion rune, which provides a unique buff similar to AMPs, and can’t be found in other item slots.
- Fusion runes can go into ANY rune type slot. There’s no need to roll one!
- You can re-roll a rune slot to a random element for a gold cost, which depends on the item level. This can get quite expensive. You can also use cash-stop currency…so I suggest you don’t start re-rolling until ilvl 80/100.
- The number of rune slots on an item is linked to the quality. Lower quality gear (blue) can only have 3 slots, while the highest quality will give you 5 slots. This gives you a total best of 35 runes TOTAL per character, across 7 pieces of gear.
- You can add a new rune slot for gold as well, though this depends on the item quality for the maximum number of rune slots. The cost depends on the item level.
- Rune quality comes in quite a few flavors. The quality decides if you can equip it or not, based on a combination of your level and the ilvl of the gear you are using.
- Lesser – ilvl10
- Normal – ilvl 20
- Greater – ilvl 30
- Refined – ilvl 40
- High – ilvl 50
- Superb – ilvl 80 (dungeon level)
- Pure – ilvl100 (raid 1 level)
- Divine – ilvl120 (raid 2 level)
- You cannot slot 2 identical runes on the same piece of gear. So no 2 Divine runes of Critical Hit. You can put a Divine and a Pure though, which is often better than putting in a stat you don’t need.
- Rune types come in 3 main flavors (See LINK)
- Basic runes add an amount to a basic stat – strikethrough, crit, etc…
- Set Runes can stack to add a cumulative bonus to some basic stats. 2 points is strikethrough, 3 points is crit chance, etc… The set cap is 6. Any class can equip these.
- Class Set Runes are specific to your class and impact specific skills, adding a cumulative bonus. The bonuses to skills are at 4 and 8 points. They are very powerful.
- The rune quality can add more than 1 power per rune. A fresh level 50 can only slot runes that give 1 power. With raid gear, you can slot items with 2 power runes- the only way to reach the 8 point bonus.
- Rune set bonuses are limited to a single item. This means, that to get the 8 point set bonus, you need at least 4 rune slots (2 power each – called Exceptional runes). This means you can get multiple rune set bonuses instead of just one for the character.
- Set Runes are limited by the ilvl (Devastation required ilvl 80, Onslaught is ilvl 50)
- The effect of a rune is linked to the element. You can only have 1 effect per rune.
- Earth – Critical Severity, Armor, CC resilience
- Fire – Critical Hit, Reflect
- Water – Multi-hit, Glance
- Logic – Vigor, Intensity, Critical Mitigation
- Life – Life Steal, Health, Focus Pool
- Air – Strikethrough, Focus Recovery, Deflect
Inserting Runes for Beginners
Given all of the above, it takes a bit of work to figure out what is the best way to slot items. This guide assumes that you are wearing ilvl 50 gear. If you have dungeon gear, then there are more/better options available.
Let’s say that you’re a DPS Esper and have a set of blue ilvl 50 Pants, with 3 rune slots. You can buy a 4th slot for 14 gold, which is a good idea. You’re given an Earth, Air, and 2 Fire rune slots. Given the item level of the pants, you can’t use Class Set Runes but you can use the general kind. Given that you’re a new level 50, you likely aren’t running around full of plat, so you won’t be re-rolling the rune slots. What’s available given those slots and at that ilvl? You can use this link to get an idea: googledocs
- Onslaught – Life/Earth/Air
- Striker – Life/Water/Air
- Havoc – Water/Air/Fire
The closest one, without re-rolling, is Havoc (3 points, Air/Fire/Fire). So let’s craft/buy the runes needed!
- 1 High Rune of Strikethrough (Air)
- 1 High Rune of Critical Hit (Fire)
- 1 Refined Rune of Critical Hit (Fire)
- 1 High Rune of Critical Hit Severity (Earth) – not part of the set but a good stat to have
You’re now at a 3 power Havoc set, plus some additional Critical Hit Severity. That gives +200 Strikethrough, +370 Critical Hit Chance and +200 Critical Hit Severity, plus the 0.17% Health and 0.2% Critical Hit Chance. That is a massive increase in power. You can repeat as you want on each piece of gear you get.
I do not recommend re-rolling for Fusion runes until ilvl80. Class set runes start at ilvl80 for PvP, ilvl100 for PvE.
Optimizing at Maximum Level
At the best gear levels, you want to aim for 2 class rune sets, then 6/6 of the basic rune sets on the other pieces of gear. Be aware, that getting the best runes is very expensive (re-rolling + the actual cost of the runes).
The general idea is the same as before, it’s just that you’re going to be re-rolling rune slots and going broke doing so (pray to RNGsus):
- Buy any additional rune slots.
- Find your class stat weights for priority.
- You don’t want to stack Intensity as a healer for example
- Find the your optimum class sets (2 of them)
- Find 2 pieces of gear that match the closest and re-roll the runes to match your class set (4 rune slots needed to get the 8 pt bonus).
- Slot each with Divine Runes (use Pure runes to avoid duplicates)
- Look at Helmets, Chests, Gloves and Weapons to ensure you have 1 free rune slot
- Apply the appropriate Fusion rune to that item
- Find your best regular set (or sets)
- Reroll the slots to match the set requirements.
- The best is using +2 power runes in 3 slots (giving the 6 total), then the extra 2 slots for another set (giving 4 total).
- For example with a 5 rune slot item, for a Devastation(6) and Onslaught(4) build, you’d be looking for Earth x2, Fire x1 and Logic x2 for the best of best stats (Crit Severity, Crit Hit and Vigor, respectively)
- Super-mega-optimal-dream-world-RNGsus-loves-you has something like:
- Weapon: Fusion + Class Set
- Head: Fusion + Class Set
- Shoulder: 6/6 Set + 4/6 Set
- Chest: Fusion + 6/6 Set + 1 Rune
- Pants: 6/6 Set + 4/6 Set
- Gloves: Fusion + 6/6 Set + 1 Rune
- Feet: 6/6 Set + 4/6 Set
- For a total of 4 Fusion, 2 Class Sets, 5x 6/6 Sets, 3x 4/6 Sets and 2 extra runes. Which is around 12,000 extra stat points, without set bonuses applied.
Runing Example
The following is an example of me actually applying runes to my engineer’s main weapon. You’ll see that it’s ilvl 90, meaning that the only upgrades are going to be from raids. So might as well make this one as good as I can!
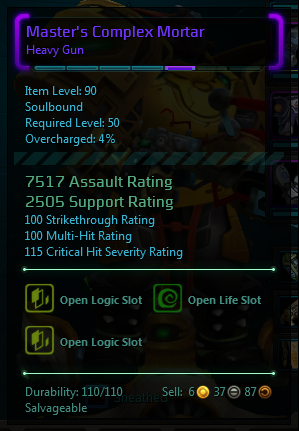
Empty Gun – bad rolls
You can see here that while the itself is pretty good, the actual rune rolls don’t help me. I can have up to 4 rune slots. I can’t use a Class set but I can use the Striker set, so I’ll aim for that. Based on the runes needed (Life, Water and Air), the actual stats I need are Multi-Hit and Strikethrough. Since I can’t use the same rune twice, I will use 1 exceptional rune and 1 regular rune for Multi-Hit and then 1 exception rune for Strikethrough. That means I need 2 Water runes and 1 Air rune. The last one is going to be a Fusion rune, which can be any type.
So let’s start re-rolling.
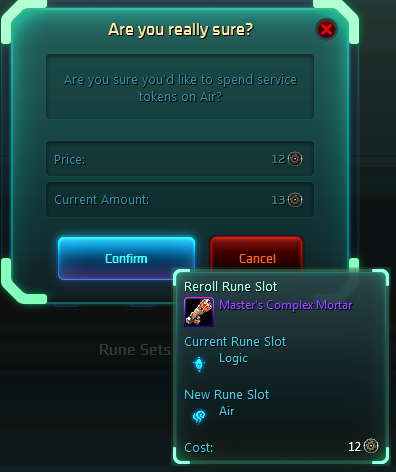
Re-rolling for service tokens
With the F2P change, you get omnibits from time to time. The absolute best use is to transform them into service tokens, and then use those on runes. To re-roll a rune slot costs 12 tokens, to add a new one of a specific type costs 25. I need 2 Water and 1 Air, so I’ll re-roll 2 of them and then add one. Total cost = 12 + 12 + 25 = 48 tokens.

Can’t have two of the same!
You’ll see here the limitations of of stacking runes, you can’t have 2 identical ones. You can see that one of them will add 2 points to the set (the purple one) and one will add 1 point (the blue one). I could have added a lower ilvl rune for 2 points, but the Multi-Hit value on the rune is worth more.
After adding all the runes, this is the end result. Notice also the set bonus.

Super power.

Cherry on top.
This is what it looks like when it’s all done. I went from 100 strike, 100 multi and 115 crit at the start and now I’m at 370 strike, 600 multi, 115 crit and Siphon. Then there’s the set bonus to it all, which comes out to about 150 extra points or so.
I won’t go over how much it cost for the runes, but it was about 1.5p per on my server to buy them. I was lucky enough to have most of the materials on hand, so it ended up a decent price for an item I won’t be replacing.
So if you think about it, for the total cost included, I easily doubled the item’s power potential.
