Factorio – Fulgora Touchdown

Welcome to the planet of near infinite materials! And the planet that’s borderline gacha with randomness everywhere. The environment itself is hostile, with lightning storms every night that can destroy a ton of resources if you don’t have lightning rods around. And the world is built with islands, some small and medium with scrap ore, and larger ones with not much on them. The oceans are pure heavy oil.

The main goal of our first foray in Fulgora is the science, but the secondary goal is learn about upscaling. Everything here focuses on the Recycler as a result.

Power

The way Fulgora should work for power is to collect lightning strikes and store them in accumulators. You will need a LOT of them. Quality accumulators are massive improvements.

Nuclear power is an entirely viable option here, shipping in some basic materials, setting up a kovarex plant, and melting ice for the needed water. It is tight space, a thing you won’t really be able to avoid until much, much later.
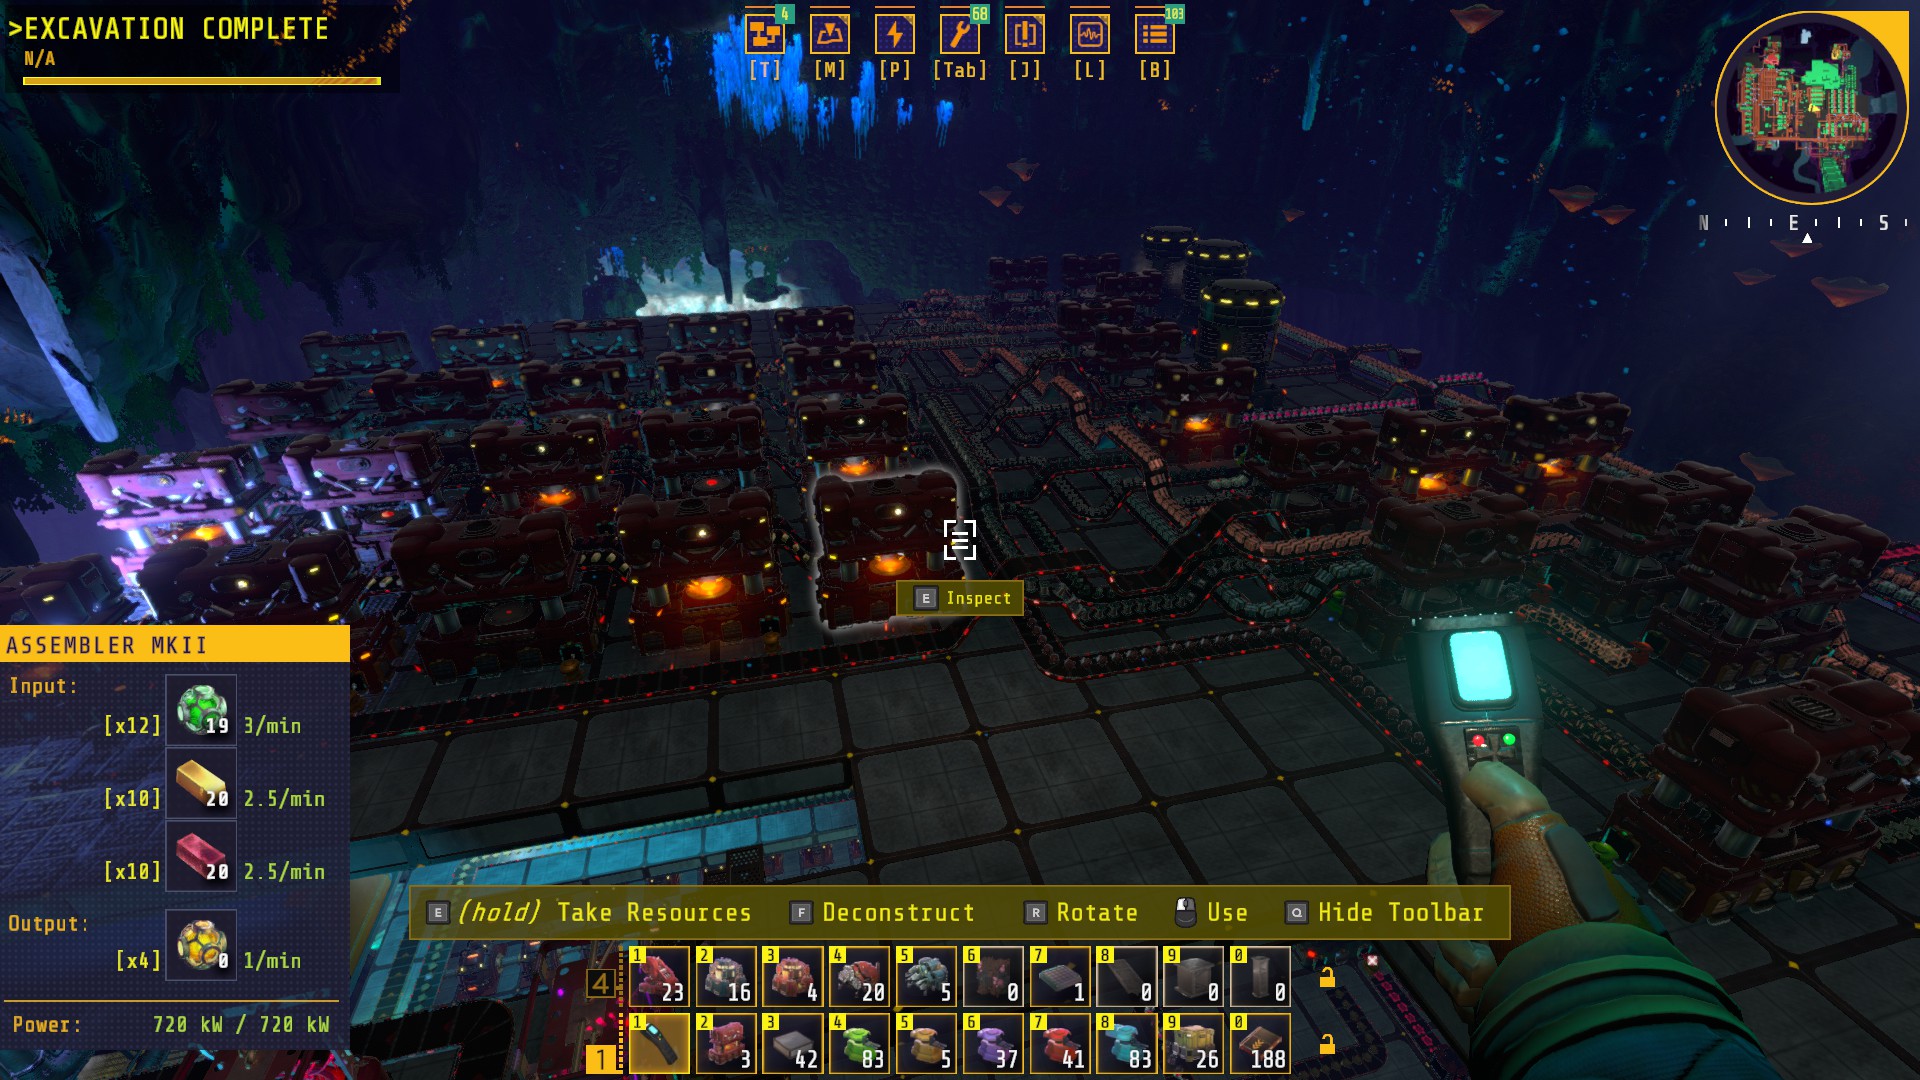
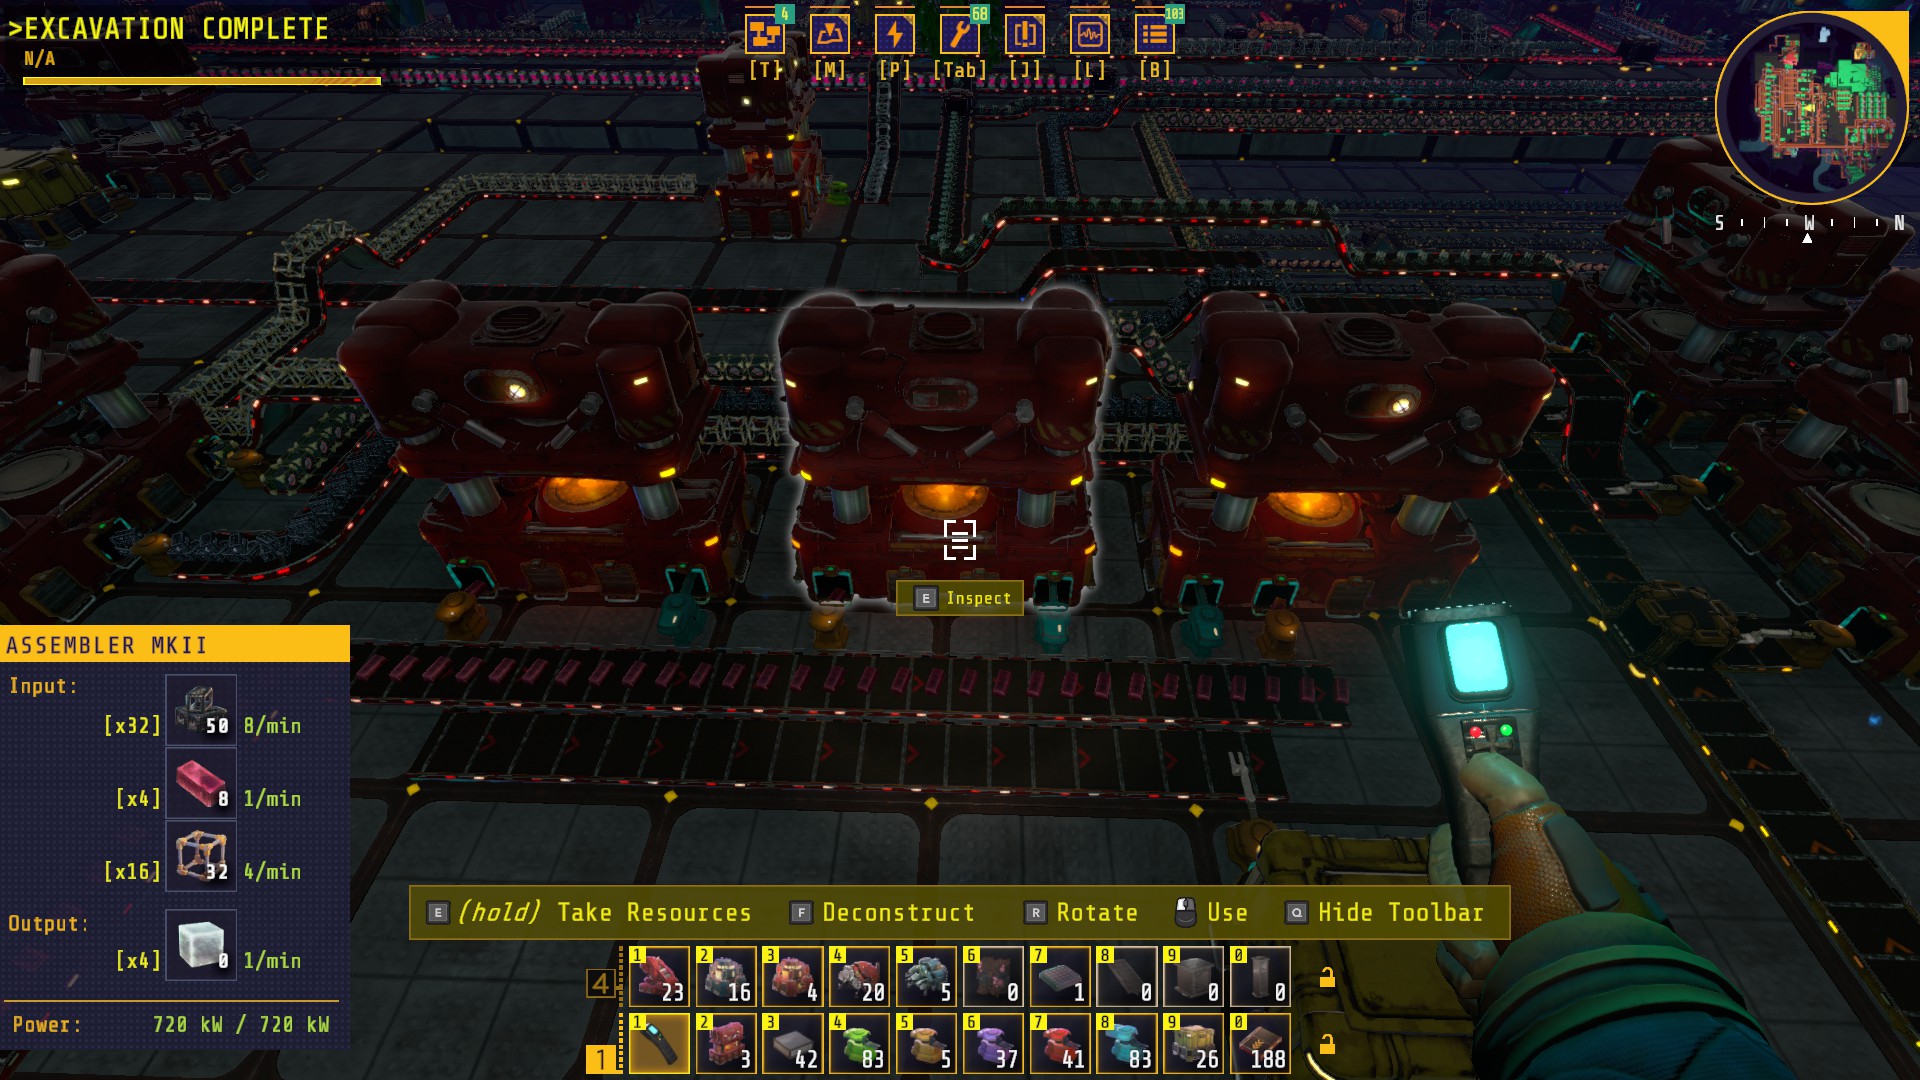
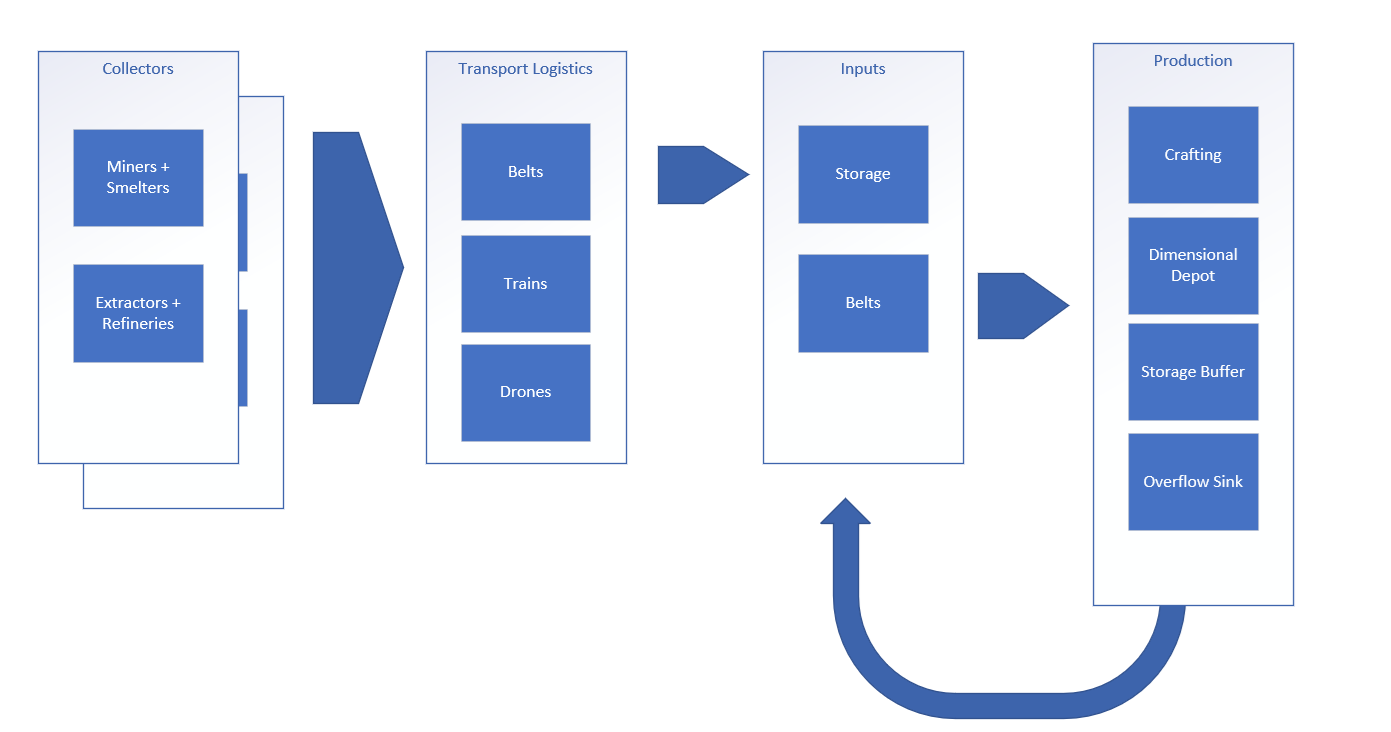
Recycler

Simple in concept, complicated in reality. You put stuff in, and the Recycler breaks it down to it’s basic components at a 75% loss. Put in 100 Iron Gears, and get 50 Iron Plates (since it takes 2 to make 1 gear). Put in Scrap Ore, and there’s 12 items that can come out, at different %. Learn to love the scrap, because it’s the only way to get water + plastic on this planet.

Also important to note that quality modules on Miners impacts the quality of the scrap, and that Recyclers with quality modules improves the quality of the outputs. So those 12 items are actually 36 (normal, uncommon, rare).
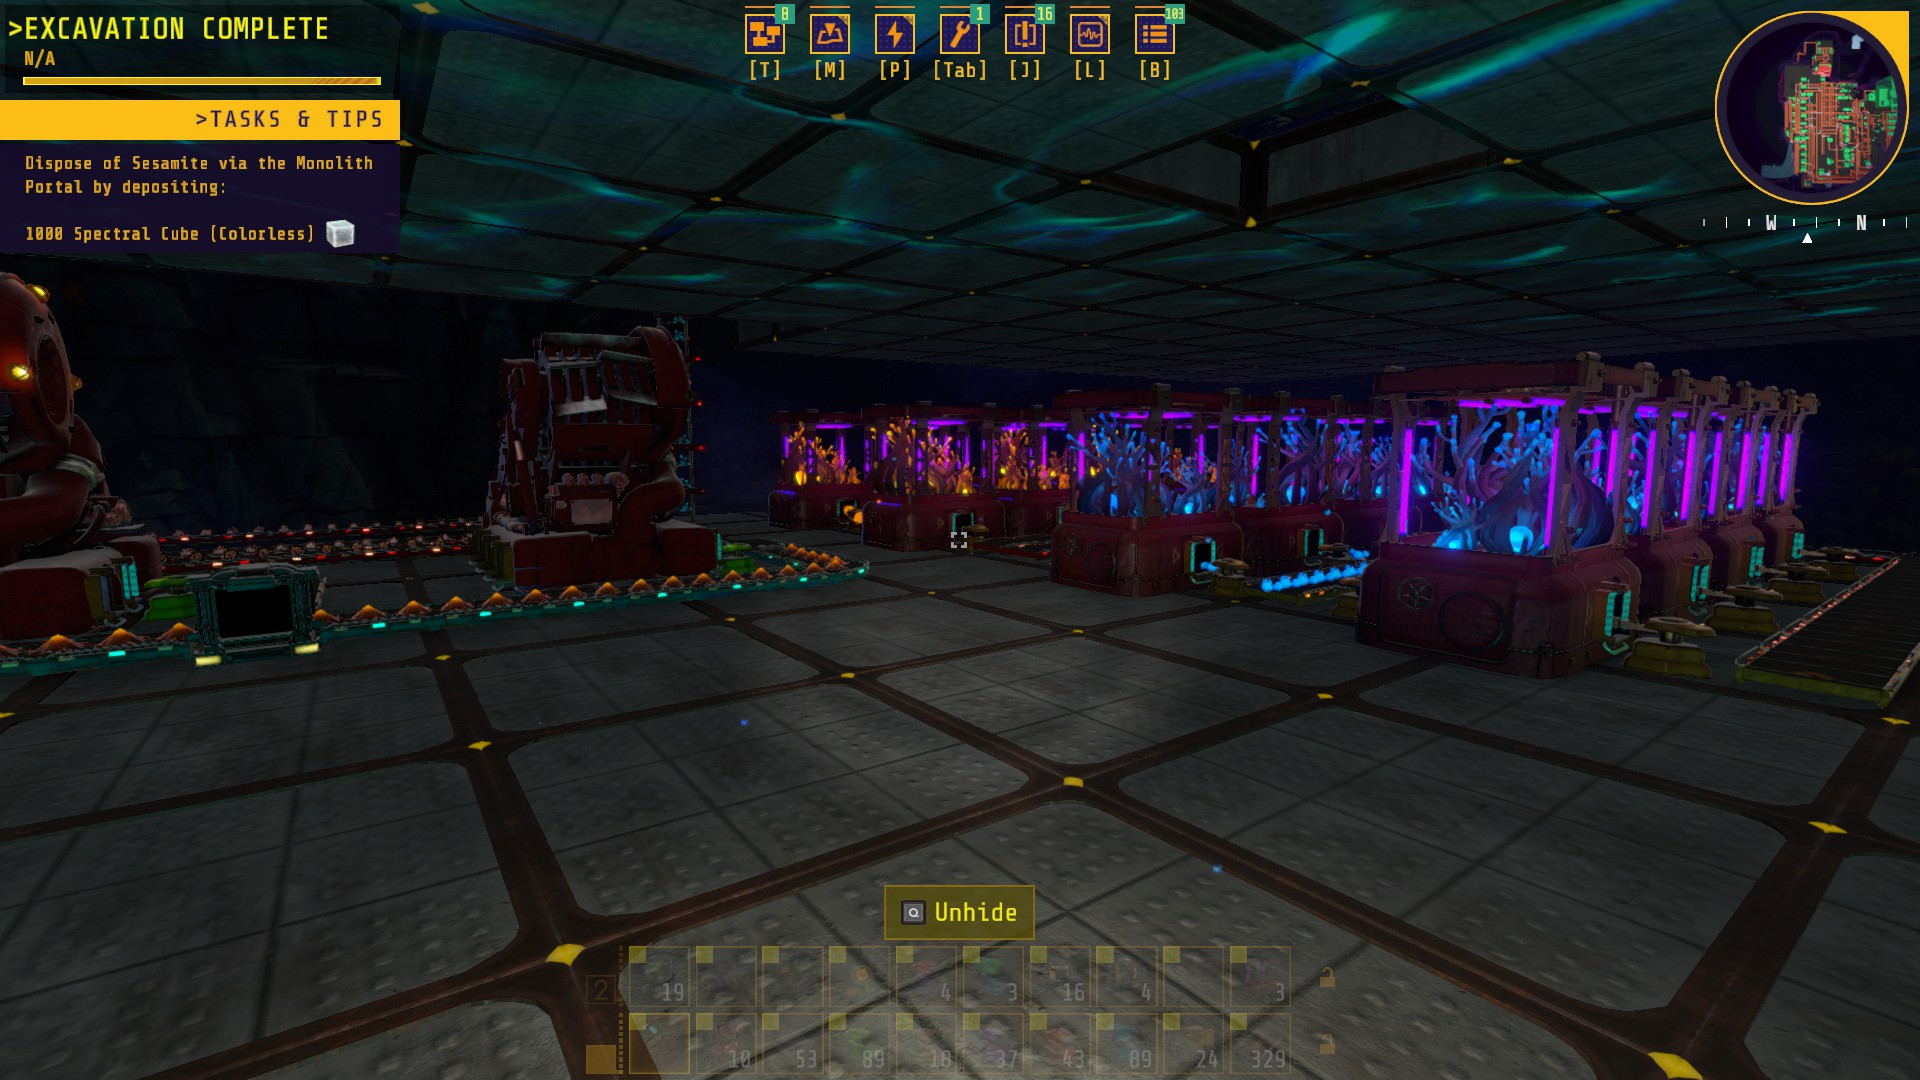
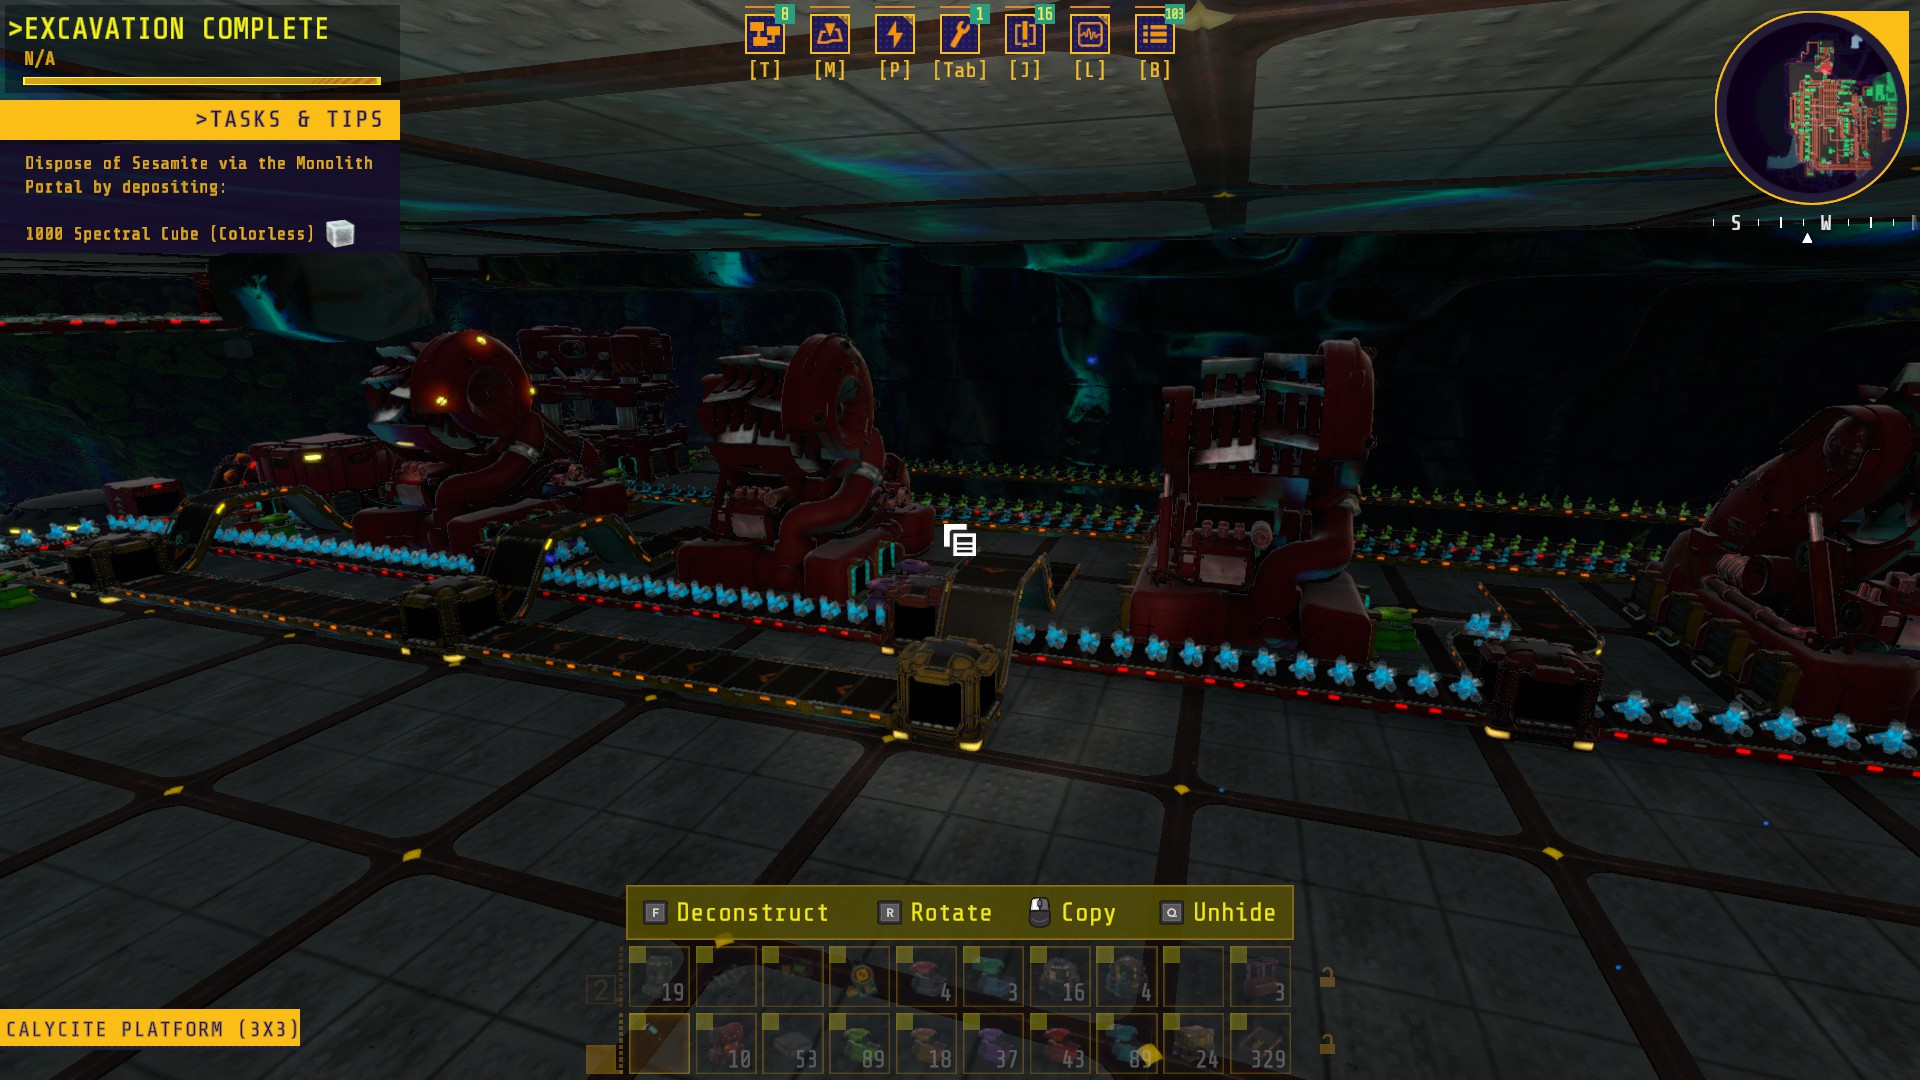
Managing Outputs

A recycler will generate a TON of random material, so you need to sort that material out. You can use splitters with filters to extract material for storage (based on quality). Anything that isn’t stored needs to route back to the recyclers for reprocessing. You will need a LOT of recyclers to process fully saturated green belts.

You’ll also find some secondary outputs, things that come out and you didn’t realize at first. Plastic, Green Circuits, Iron Plates, and Copper Plates are notable. Size wise, you’re going to need a filtering belt that’s as large as your recycler belt.

Once you have the outputs filtered into storage, you’ll have near infinite basic materials on hand.

Holmium Refinement

This is the unique planetary ore, and it’s only available as a byproduct from scrap ore. Importantly, the quality here doesn’t matter as it gets turned into liquid that has no quality. Well, quality DOES matter because you can only insert like-for-like items. Since it takes 2 items per input, you must insert the same quality items. End result, you need 1 Chemical Plant dedicated to a given quality of ore.

Using Foundries will create a TON of Holmium plates. One Foundry is more than enough to fully saturate, and it gets crazier when you add productivity modules.

Holmium is also used to create Electrolyte, a liquid used for most end-products on Fulgora. Nothing too complicated here, as it only requires Heavy Oil. These will give access to Superconductors + Supercapacitors, which give you access to this planet’s science. The wide majority of this processing is done as you would with other oil processing, taking up a relatively minor amount of space.

Quality Matters

The science here gives you Mk3 Quality Modules and most personal defense items, like Mech Armor, Mk2 Personal Roboports +Mk3 Batteries. The question is, does quality matter? It only matters when you are restricted in build space. If you have an infinite field, then adding 50% more things to it is simple. If you are limited, then you want the things on that field to be 50% more efficient. In that context, personal equipment is absolutely worth upgrading. For crafting buildings, this gets complicated as it can mess up production chains. Specifically on Fulgora, higher quality capacitors (to store energy) are amazingly effective. Normal store 5MW, uncommon 10MW (100% improvement!), and rare 15MW.

(Important note: the game has an atrocious interface when it comes to managing quality products. I can handle the quality limitations, but the ability to upgrade/downgrade/sort by quality just isn’t there. Find a mod or an upgrade blueprint, there’s plenty on Reddit.)

Upscaling

There are two ways to generate a high quality item.

  1. Use quality modules and pray to RNGsus, managing the random outputs.
  2. Use quality ingredients to create a same quality item.

Upscaling is the act of applying both methods. Use randomness to hopefully create better products, recycle the items that were not upgraded, and then re-use those quality items to directly create quality products. Sounds complicated, and it kinda is.

A practical example is Quality Modules themselves. You’ll start Fulgora with Mk2 modules, giving a 2% chance of improvement. You’ll leave with rare Mk3 modules, which give 4%, a 100% improvement.

The regular process of making modules starts with Mk1, then Mk2, then Mk3. Using belts, you can set up a production chain to create normal versions with normal material. If you insert quality modules at each step, you have chances of increases rarity. The trick then is to extract the uncommon / rare modules from the production chain. That’s the 1st part of the process, and entirely possible to generate a Mk3 rare module (at 8% quality, that’s 8% at uncommon, and 0.8% as rare).

The next step is to create with quality materials, which will be very slow as the materials will be hard to come by – especially circuits. One station will create uncommon modules with uncommon materials. Again with quality modules. Another station will create rare modules with rare materials. This is the 2nd part of the process.

You will want to use the quality modules on every Recycler and every Big Miner, eventually having them all rare Mk3. You could recycle excess modules, which I would only recommend if you have more than 500 of any given one in stock. Eventually you’ll need them when getting to epic/legendary levels.

Mech Armor

This thing rocks. It automatically flies over everything, including water and trains. You absolutely want to have it equipped. Quality matters here:

  • Normal: +50 inventory, 10×12 equipment grid
  • Rare: +80 inventory (60% more), 12×14 grid (30% more)

Exoskeleton goes from 30% to 48%. Mk2 Roboports recharges 6 bots instead of 4 and use 40 robots instead of 25. Mk2 shields go from 150 to 240hp. All of these are awesome investments.

I do not recommend method #1 to create these as the material costs are quite high. Create rare versions of the base material and the final step can then be guaranteed. It will be multiple steps, but I found it absolutely worth it.

Next Steps

If you don’t care about quality, then Fulgora is the quickest and simplest of all the extra planets. Once the recycler production chain is up and running, science is a quick hop away and you’re done. A Tesla gun + ammo is useful on Gleba, and you will want to extract a few Electromagnetic Plants + Tesla Turrets as well. The really good news here is that the recycler gives you Blue Circuits, Low Density Structures. Rocket Fuel is free since Heavy Oil is free. You won’t ever need to import them.

I would not create any production chains to create circuits yet. You may have all the ingredients to do so, but the throughput is a real mess, and it’s honestly harder on Fulgora due to the need for Plastic. But, that’s for later.

Turning Back

With the Electromagnetic Plants, Foundries + Big Miners, now is a good time to return to Nauvis and upgrade your production chains to improved tools. I say Nauvis as you likely have ample space to build whatever you want, and the power management options are easier, and all research is done here. In that regard, it makes sense to just upgrade the base planet.

I will say that Vulcanus is the golden planet and you will likely want to build green/red/blue circuits for shipping here as 99% of the material (tungsten is the exclusion) is free.

Factorio – Vulcanus Part 2

I have to say, Vulcanus is a really enjoyable experience. The enemies are straightforward and won’t attack, the materials feel borderline infinite, and the new equipment here is game changing with an inherent 50% productivity boost. The productivity boost has massive impacts, notably on scale of the factory and importantly, power consumption.

Mini Bus to Main Bus

The mini bus concept is rather simple. You need just enough material to go through it to supply the creation of metallurgic science, which is surprisingly little. Sulfuric Acid, Lava, Coal, Calcite, Water, and Lubricant are all you need here. The first 4 are easy to get. Water comes from a Calcite reaction, and Lubricant comes from Heavy Oil, also from Calcite.

The mini-bus should be enough to create all the basic materials you need, including Foundries + Big Miners. Red Logistics + Bots should be shipped in from Nauvis, as needed.

Only once you have this part down will it make much sense to extend your area to include Tungsten mining. There’s ample on the ground to keep nearly every other part working smooth.

Power Consumption

One bit that I really didn’t think much about on Nauvis is how power is consumed, or rather mitigated. You can only ever hit -80% consumption, which is 2x Mk2 Efficiency Modules. More than than is wasted. Clearly this changes if you have other modules around, so math away. I never found the need to upgrade my power grid from first landing until I left.

Big Bus

Once you do have a Tungsten mine available, time for a main bus. This one will include all the base Foundry material + liquids. Iron plates, gears (you will need 2 belts), steel, copper plates, tungsten, low density structures, and rocket fuel. Iron rods aren’t all that useful at large scales, and concrete is more for aesthetics.

The metal products should be linked to 2 foundries, which should fill a green belt full of material (60) by the end. All stone should be converted to landfill and belted to lava for disposal (unless you really want to have a ton of concrete). These production lines should be at the start of the big bus.

The liquid production will need it’s own dedicated plant. Coal Liquefaction is your best bet for Heavy Oil, then your standard oil setup from there (Water, Lubricant, Light Oil). I build Rocket Fuel near here as well since it needs Light Oil.

Green Belts

This is the the gold mine of Vulcanus, Mk4 belts give you 60 throughput, which is a substantial upgrade and they are practically free when produced here. Recall that all logistics are progressive, so that Mk4 belts require Mk3, Mk3 require Mk2, and Mk2 require Mk1. Foundries have an inherent 50% productivity rate, and if you put 4x productivity modules in there, it’s ~75%. With 12 Foundries, you can quite easily pump out couple thousand belts in a few minutes and they will completely replace all belts laid from this point forward.

Works like a charm. Forgot to add efficiency modules though.

Circuits

Green Circuits can be made in a single assembler as the materials here are free and the demand quite low. Red circuits are only used for constructing splitters and much less than you’d think. Shipping in 1000 will be enough for a very long time.

Blue circuits… this is going to be a problem. You will need a handful for green splitters, but the real sink is going to be rocket parts. You’ll need to ship in a good 2000 if you want to export science reliably. As long as Nauvis isn’t in the middle of a production spurt, this should be simple enough. This problem goes away after Fulgora.

Prep for Fulgora

Fulgora is my preferred 2nd choice, as it provides some mostly quality of life updates and does a great job to introduce you to quality scaling. It absolutely requires Big Miners (40) and Green Belts (2000) in order to function, as the scale of production is like nothing else you’ve seen. Foundries (20) are helpful for a specific ore. You’ll need pretty much the same things you did when you landed on Vulcanus, except Fulgora has no solar. Fulgora does not need any Calcite. Once you have the materials ready, head out to space.

Factorio – Early Vulcanus

The reason I chose Vulcanus is simple. Cliff Explosives. Ok, it’s more than that, as the Big Miner (faster, consumes less material), Foundry (50% production bonus), Coal Liquefaction, and Artillery are locked here. There’s certainly more for sure, but those are the ones I absolutely want to unlock before heading to the next planet.

Given it’s the first planet, I have zero optimization and a ton of guess work to have anything work. High level, the planet has:

  • Coal, Sulfuric Acid (liquid), Calcite (also found in space), and Tungsten (in Demolisher territory).
  • Decent solar coverage.
  • Lava all over the place, no trees, and no water.
  • Cliffs everywhere.
  • Demolishers that protect their territory (denotes by red lines).

The lack of materials is the core issue. Robots can disassemble material on the ground for iron + copper + stone, which clears the ground enough to lay out some substations + roboports to frame future growth. From that…

  1. Lay down a Cargo Pad to receive material from the Space Platform
  2. Put down a dozen storage chests
  3. Put down a storage chest + 2x electric smelters to create iron plates, copper plates, and stone bricks.
  4. Put down 50 solar panels + 20 accumulators.
  5. Mine calcite + pump sulfuric acid into a chemical plant to build steam. 30 steam generators are enough to power a LOT.
  6. Craft 1 Foundry in an assembler (use steam to create water). Craft 20 more foundries in the new foundry.
  7. Build a bus that routes lava, water, lubricant (sulfuric acid -> heavy oil -> lubricant), sulfuric acid, calclite, and coal.
  8. Place a dozen assemblers + requestors to create intermediate materials like green circuits and electric engines.
  9. Use foundries to create all iron, copper, steel items possible. Use foundries to create refined concrete and big miners.
  10. Use foundries + assemblers to create tungsten materials based on material on the ground.
  11. Use foundries to create orange science (?)
  12. Export science to Nauvis.
  13. Profit.

It’s actually a rather straightforward process up until #11 as you won’t have enough tungsten and will need to mine it. However, all patches are in Demolisher territory. The only way to take those buggers out is with a dozen turrets & tank with uranium ammo and tier 6 damage research – which you’ll need to ship from home.

Dealing with Demolishers

Demolishers are worm-like creatures, with 30,000HP+, that deal tremendous AE fire damage and have substantial regeneration capabilities. They patrol a given area on the map, denoted by a red outline. Build anything on that area, and it will be destroyed. The only defense is offense.

While there are many strategies possible, I prefer simple brute force. They are immune to explosive, laser, and impact and take 50% from physical and 80% from electrical. Uranium Canon Shells deal 2K per shot as a base, + 100% per upgrade. You’ll likely be at 10k+ per shot by the time you land. Turn off auto-robots (or they will die from the AE attacks) and shoot it from behind. 3 seconds later, dead worm. Repeat for all areas touching the starting area and you’re good.

Next Steps

The start of Vulcanus is primarily about stability and getting the first few Orange Science items unlocked. Of important note is that Vulcanus will generate an overabundance of stone. Way more than you can use. So much more than you can possible imagine. Use what you can for refined concrete, but the rest should create Landfill with the stone, and insert it into the lava to dispose. Failure to manage stone will mean your production lines will be stalled.

Final quick note, science stacks in sets of 1000 per rocket, and you should be able to generate 2k per round trip. An unmodded Rocket Silo requires 100 Blue Circuits, Rocket Fuel, and Low Density Structure to launch. If you return from Nauvis with 200, the cycle will work 100% of the time.

Next part is how to optimize Vulcanus before leaving to the next planet. That means Big Miners, Foundriess, and Mk4 Belts.

Factorio – Space Age

You knew this was coming.

There’s already enough out there regarding Factorio, it has set the bar for what factory automation games need to bring. v1.0 launched in 2020 and many an hour of productivity was lost around the globe. Space Age came out a month ago and certainly has had a similar impact.

You can still play the base game, with a more refined process to reach the final rocket to space. It’s a relatively straightforward affair without too much difficulty.

If you play Space Age though, expect some significant shifts. You can rush to space at the blue science phase (which is VERY early) and rockets are 90% cheaper to produce. A fair chunk of tech also shifts to later in the game, painfully that includes Logistic networks, Artillery and… cliff explosives. I made a serious mistake and forgot to remove cliffs and only realized after a chunk of time was invested. You used to be able to make them at home, but now they are locked behind Vulcanus. Argh! Side note: this is why elevated rails are in game now, you can’t avoid cliffs on Vulcanus.

One item I think Space Age struggles with is the transition to space, at least from an information perspective. The terrestrial components are self-evident and you can relatively easily modify them to suit a need. The space platform is not like this at all. You can’t actually build anything until you ship it up to space, and that mechanic in and of itself isn’t clearly explained.

The breadcrumb to build space science it to build a rocket, launch a platform starter pack, and then install an asteroid collector. Fine, I did that. Then what? Oh, I need belts, inserters and an assembler. Ok. And I need to crush the materials to make it. But make sure I don’t collect too many materials, because there’s no actual storage for it. Ok?

You can play Factorio from start to finish for years and never really need to worry about dynamic filters. You set a filter on a box to have, say, only pumps. Set it, put a limit of like 100, and you’re good forever. Space is not like this. You want to actively avoid collecting asteroids you don’t need, but that need will fluctuate over time. And you can’t place chests in space or robots, so the old logistics network model doesn’t work. Honestly, I couldn’t figure out half of it until I looked up a few videos. Suffice it to say that you should ensure that every single requester chest in your planetary network has at least a full stack of any item, or it won’t even ship 1 of them. Yes, you need to store 10 Asteroid Collectors even if you only plan to use 1.

Minor note: If for some reason you have tried to improve quality of items, I would recommend quality Asteroid Collectors, Cargo, Solar Panels and Propulsion. The rest is useful but not incredibly impactful. You can easily get between planets without any quality items.

Transporting items to the platform for basic construction will take a while. Transporting items in preparation for a flight to another planet… that may take an hour or more, depending on how your planet factory is set up. 1000 blue chips seems small enough, but less so when you’re in the middle of a module construction phase.

There are ample designs out there, and most of them follow the same concepts. What I will say is that the act of building the space platform itself does a great job of preparing you for another planet. You are likely running a major hub and pumping out tons of stuff over a large area. Depending on your choice of new planet (if it isn’t Vulcanus, what’s wrong with you?) you will be limited in space and material. So the question is, what is the bare minimum set of stuff you have to bring with you to survive and ensure your ship can return to refill?

Personally, that means:

  • Mk3 Assemblers + Miners
  • Bulk & Long Inserters
  • Belts, Undergrounds, Splitters (Mk2 are good enough). Lots of belts.
  • Solar Panels + Accumulators + Substations
  • Roboports + a LOT of robots (400 of each type)
  • Logistics containers, especially storage + requestors (requestors will save you a LOT of belts)
  • Mk2 Modules (Speed, Productivity, Efficiency)
  • Oil Refinery + Chemical Plant + Pumps + Pumpjacks + Liquid storage
  • Red + Blue Circuits (since you won’t have access to Plastic for a while)
  • 1 Cargo Pad (to receive material)
  • Vulcanus in particular can use Steam Turbines for power generation, bring those!
  • Enough material to make a NEW rocket silo (you can’t move one, you can only move ingredients). This is important but you can do it on the 2nd logistics pass. You need to get Science Packs transported.

That’ll be enough to kickstart a new planet base, and give more than enough time for a refill voyage when you naturally run out of materials.

Techtonica – Final Steps

Of important note, while you can unlock yellow science, you don’t need it to complete the game. In fact I’d recommend you avoid all yellow science until you’ve unlocked every single green research.

This entire setup generates 20 yellow per minute. Relay Circuits are the scaling challenge. Ratios mean this generates 600 red per minute.

The final green research item are the colorless cubes, which are needed for the final quest step. You’ll get 2 recipes, both of the same name but with slightly different icons. One gives a basic ratio of 1/minute. The other takes 400 input of the first recipe to give 1/minute, which clearly is broken. I’d go so far as to say both recipes are broken, as you’ll need a good 10 Mk2 Assemblers to make enough cubes in a reasonable time. There are no parallels to this scale of production.

This is the “simple” recipe.

Once you have 800 of those cubes, you put them in the machine on floor 16 and get to watch the final scenes play out. I won’t spoil the story here, as I think anyone who has invested the amount of effort to get there deserves to see it themselves. I will say that there is another milestone for 8000 cubes afterwards, which effectively made me save and quit the game.

My thoughts on Techtonica 1.0 are mixed.

  • I really like the setting and foundation of the game. 3D voxel based factory just plain works.
  • I think the multiple floors work, and work even better if you never played EA. It dramatically goes against the grain of ‘the factory must grow’, which is where the majority of player issues stem.
  • The early to mid game portions are well constructed, and generally well balanced. A main bus on multiple floors is both functional and aesthetically pleasing.
  • The story works most of the time, which I found entertaining. The final scene lays the groundwork for more, so fingers crossed there.
  • I like the concepts in floors 12+, but the implementation has issues. I get the decisions made to create these environments, and they do change the gameplay. The math however, just doesn’t support these new mechanics.
  • The inability to manage overflow outside of Mk2 Storage is a real pain point preventing large scale factories. Blast Incineration worked in EA as the numbers were smaller. It doesn’t work here.
  • Some recipes are clearly broken. Either that, or purposefully designed to create timegates.
  • Power management doesn’t really exist. Waterwheels + Mk2 Cranks come early and you’ll need a couple hundred total to keep floors 1 to 11 running. The options for floors 12+ are impractical.
  • The tools to build nice looking factories are too cumbersome. The lack of blueprints & remote logistics compound this issue.
  • In general, I think the game works. Certainly if this was still in EA. That it’s 1.0, well that’s a tougher one. There’s clearly a need for a balance patch.
  • I do think the devs have done a ridiculous amount of work to get here and it shows in multiple places.

The reality of development cycles and costs means that this is almost guaranteed to be the last content patch of the game. Ideally there are a few balance patches that tweak some numbers without mechanical changes. Ignoring the content of floors 12+, there is tons of amazing content in Techtonica and dozens of hours of fun to be had.

I still recommend Techtonica, warts and all, if only to show the potential of the genre in a grid-based 3D environment, with story elements abound.

Techtonica – Crusher Uses

1.0 added a whole new tier of items related to the sand levels, and all of them revolve around Crushers. And Crushers themselves have weird production chains, with quite poorly explained logic and recipes. To see what a Crusher can do, you need to open it’s interface and hover over materials in your inventory, which will populate the recipe on the right side of the screen.

Note: If you put in at least 3 Sand Pumps on floor 12, you will remove enough sand to find 10 Crushers. Do not craft Crushers, until after you’ve placed these 10.

The defining feature of the Crusher is that it operates in high quantities – either in or out. The side effect is that the Crusher never works 100% of the time, as it needs to queue materials, even with stacked inserters. It’s also the largest structure you will build, both in x/y footprint, but also 2 voxels more in height. This means that it cannot be integrated into an existing multi-floor factory.

There are a few uses for the Crusher, almost all of which are locked behind research.

  • Scrap Ore crushing. It takes 250 Scrap Ore, and combined with some other ingredient (in very small quantities) will generate a slew of other items.
    • Scrap Ore should only be collected as slabs through Blast Miners, the belts in the game are incapable of supporting anything else as the compression ratio is wild. Bring the slabs back, crush them, make 250 ore + a minor amount of limestone (which you can compress to a brick).
    • If the Scrap Ore has multiple outputs, you need stack filter inserters and storage. Most items will come out at slow enough rates you can supplement other lines. The exception is Shiverthorn Gel Extract, which will eventually log up your production lines.
  • Sand crushing. There are variants in here, and some of them generate power.
    • Generating power is how you’ll get to be self-sufficient on floors 12+. You’ll need accumulators given that the Crushers don’t run 100% of the time, and it takes a LOT of sand to keep them running. You will likely want that sand for other things before you want it for power.
  • Ore/Slab/Material crushing.
    • Think of this as accelerated Threshers with better ratios. On paper it seems great, but be aware that you will need a ton of power and space to run this setup. This is so incredibly effective in speed/ratio that you’ll likely rebuild your factory around it.
    • If, for some insane reason, you are using ore powder, this method will completely saturate all your belts with a single machine.
  • Biodiesel Refinement
    • It’s a very large ratio of Assemblers to Crushers for the refinement process, and you’ll need 2 Crushers as it’s a 2 step process, with byproduct. This should be the #1 priority, as it’s the only way to operate Sand Pumps at scale.
  • Material compression.
    • Similar to Blast Smelters, Crushers can create some types of bricks. This is effectively a ratio tool for storage purposes… but also the likely source of Plantmatter Bricks in late game.

The largest challenge I’ve found with Crushers relates to the relatively poor tools you have to deal with them. They should operate at 250 items per minute, which can easily be accommodated by a Mk3 belt + stack inserter, but they clearly don’t. There are often multiple outputs, up to 3, that require a lot of belt magic and space to sort out. The lack of prioritization on belts means you’re going to saturate some belts and exhaust others if you don’t plan ahead.

I like the concepts of Crushers, just like I did with the Blast model when it first came out. The practical application of Crushers naturally create significant logistical issues that the game currently doesn’t explain well enough, or provide the tools to effectively manage. More specifically, the lack of a practical sink mechanic really shows up here. Blast incineration is the only method, but you need to build a dedicated machine per item type, which basically means a few dozens machines where a single one should suffice. This isn’t a math problem, it’s a mechanical one, meaning there’s no readily available solution.

Related, the Sand Pump mechanic is conceptually sound, but has practical limitations. First, the ratio is 100% if you are positioned over a sand well, and 50% if you are anywhere else. At the start of a sand floor, you are always 100%, but you will need to move the pumps as the floor drops, which means insane spaghetti belts to get fuel to and sand out of the pumps. The lack of power transfer to these floors means that you will only ever run Sand Pumps on the last 5 floors and nothing else. Floor 12 requires 3 pumps at 100%, floor 13 needs 5. Floor 14 needs 24, floor 15 + 16 need over a dozen each. There’s no sugar coating – this is timegating and poorly implemented at that. Thankfully you don’t need to do anything except access floors 14 and 15 in order to progress the story, and floor 16 requires zero sand pumping. Get to the bottom of floor 13 and you’re set.

I do feel that with a few tweaks these things could be rather ‘easily’ addressed.

  • Sand Pumps should have research options to increase their speed/effectiveness.
  • There should be a research item (or unlockable) to transfer power to the sand floors, so that you can build factories there. You can technically do the entire floor without power with basic inserters (20/min) but will need a dozen per pump.
  • Floors 14+15+16 sand pump rates need to be changed.
  • Crushers should have the option to destroy (or make Carbon Powder) any item

As it stands, the sand mechanics are interesting to manage on floor 12, and very uninteresting past that. Fingers crossed this gets tackled soon.

Techtonica – Plant Production

Plants in Techtonica are their own production chain.

Multistep processing

Oddly the game starts you off in the Triage phase, with Kindlevine or Shivertorn collected from the map (you’ll have double the former), which you will thresh into both seeds and stems/buds. Seeds go to planters to make more of the base item, with zero loss. Each Kindlevine costs 1 seed, each seed provides 1 Kindlevine. You are effectively harvesting the byproduct.

The refinement stage splits that output into 2 items. Stems = Kindlevine Extract and Plant Fibre. Buds = Shiverthorn Extract and Plantmatter. The interaction between these various outputs allow you to refine the Stems/Buds so that you increase the primary output and stop making the 2nd. By the time you unlock this feature, it’s a good idea to convert to an optimized cycle. There comes a point where you have no use for either Plant Fibre or Plantmatter.

At the start of the game you’ll lack the tool & seeds to run anything complicated. Maybe 8 planters per basic thresher, then 4 threshers to refine. As you progress, you will optimize the refinement, unlock Mk2 theshers (triage first!), get better planters, be able to convert between seed types, and finally unlock a late game new seed.

A set of planters and threshers for the triage phase
Byproduct processing. After optimization.

Finally, know that the production chains here start simple and eventually gain tons of flexibility and therefore complexity. For example, you’ll need Plantmatter bricks. You’ll eventually unlock 6 different production chains that get you that product, and each of those has complex chains before. Which one is the “best” one? That answer changes depending on what tech you have unlocked. There are plenty more of these decision points, meaning that Techtonica is a game of near constant tinkering. Some portions are set it and forget it, others… well you’re going to be rebuilding along the way.

Techtonica – Blast Math

Right to the point here, Techtonica’s UI isn’t the best, and it becomes really hard to figure out ratios to math things out. Less an issue for Assemblers, but all other tools only give you info when they are running.

Blast Miners + Blast Smelters are the best example and it took my much too long to figure out their math. They operate on rather simple rules:

Blast Miner

  • Cycles every 12 seconds, so 5 times a minute
  • It will consume ALL the Blast Charges deposited every cycle. Max is 20 you can insert
  • Depending on your research level, you will get increasing amounts of chunks per amount of Blast Charges. 1:1, 3:2, 5:3, 10:4, 15:5. If you don’t have the research, the charges are simply wasted.

Blast Smelter

  • Cycles every 12 seconds, so 5 times a minute
  • It will consume ALL the Blast Charges deposited every cycle. Max is 20 you can insert
  • Depending on your research level, each charger will increase output to 1x, 4x, 6x, 8x, 10x if the corresponding raw material is inserted.
  • It only ever needs 1 Blast Charge to reach this amount.

The result of this is that the Miner actually has a math problem, as the # of charges has an impact on the output. The Smelter only ever needs one, and that math is rather simple to sort out.

Math Time

The larger challenge in all this relates entirely to Inserter speed, belt speed doesn’t mean much at any point. Reminder that:

  • Basic Inserters: 20/m
  • Long Inserters: 15/m
  • Fast Inserters: 40/m
  • Filter Inserters: 30/m
  • All others use stacks, so the math is only relevant to put the charges in temporary storage.

Belt splitter math is next, a you cannot prioritize outputs, everything is split equally. This means that you can only work on factors of 2, 4, 8, 16 and so on. (Truthfully you can work with odd numbers, but the belt math becomes stupid.)

With that, Smelters are actually really easy, as each need 5 per minute. A Basic Inserter shoots out 20/m, so split to 4 Smelters in 2 stages is enough (split in half, then split those halves). You can use Fast Inserters to split to 8 with the same logic. Assuming you have a storage box, that’s 1 inserter leading to belt pathing, so technically you can have 7 outputs. Technically a lot of things can happen. Still, it’s simple enough to make work and really hard to mess up.

Miners are a right nightmare and I would strongly recommend only using 1 Blast Charge per cycle until you unlock the ability to mass produce with Crusher tech. The production ratios just get stupid otherwise. At 1 charge, easy peezy, same thing as Smelters above.

In the late game (assuming you don’t have infinite mining nodes) you’ll worry about vein exhaustion and want to increase the ratios. Recall, 5 cycles per minute, and 15 per cycle, meaning 60 per Miner per minute. There are no inserters where that math works so you’re left with 2 options.

  • Option 1: Use a combination of a Fast Inserter (40) + Basic Inserter (20) on a single belt to the miner.
  • Option 2: Use a Mk1 Belt, a Stack Inserter (as long as it’s over 120), and split it once. That will give 60 per belt.
  • At 2 per cycle, that’s 10 and you should split a Basic Inserter to 2 Miners
  • At 3 per cycle, that’s 15 and you should saturate a belt and use a Long Inserter on the miner
  • At 4 per cycle, that’s 20 and you should saturate a belt and use a Basic Inserter

The reward for this math problem is producing slabs of material, which is absolutely game changing and the only way to run machines in the Crusher phase (floors 12+). It also blends well with a more complex production chain involving powders, as production of slabs can double – at the cost of triple the production complexity.

I do enjoy solving math problems, and Techtonica’s sparse UI means that there’s a lot of trial an error required to solve it out. Nearly every other factory game supports the concept of saturated manifolds, and this is a true standout example of an exception. Good luck!

Techtonica – Main Bus

Factory games generally work better with a main bus to manage the distribution logistics. That is, the ability to move material around efficiently. Recall this visual from Satisfactory

Satisfactory Main Bus Concept

Techtonica does it different, as it doesn’t have a large map (or at least it’s broke into instances) and doesn’t have liquids. It does have complex production chains though.

Techtonica Main Bus Concept

In some games, you’ll have a main bus, then dedicated arms to craft a given thing, which takes up a lot of room. Space restrictions in Techtonica mean you need to build compact and plan WELL ahead of schedule. The good news is that the vertical space is rather large. As a general rule, you can dig around 5 spots higher than the highest point of the ceiling until you clip out.

Now in terms of planning, you need:

  • Power. Lots of it. Power in Techtonica is dependent on water. Floor 2, 7 and 11 are the only places with enough room for this. And Accumulators (batteries)
  • You need an open space. Almost every floor has this, though floor 4 may be the best option.
  • You need Iron, Copper and Limestone available. Only floors 2 & 11 have this. You can ship the other material through the elevator.
  • You need a LOT of logistics items. Meaning Belts, Floors, and Inserters. I strongly recommend having a dedicated station to build this that isn’t part of the factory at the start. You also want to research vertical belts quickly.
  • There are 3 types of production (Assemblers, Crushers, Threshers). You need dedicated space for each.
  • Research cores need space for a core composer. They are big and should be put far away.
  • The elevator can transmit power through the floor, items through the ports.

For my playthrough, I have a ground floor for mining & power generation, the next floor covers the entire zone. The first floor will be split into 4 sections.

  • The absolute farthest part will be for Core Composers (research cores).
  • Close to that area, I’ll have Accumulators (though for practical purposes, you can easily place them on any other floor.) You will use floors above this location for Crushers later in the game.
  • Third, is a large area that supports 16 Planters and 4 Threshers. You’ll need 3 floors eventually
    • 3 floors of 16x planters
    • First floor to thresh plan materials into intermediates
    • Second and Third floor dedicated to processing intermediates.
  • Finally the factory proper.
    • For most of the game, you’ll need ~12 lanes in the bus. Each lane should have a space between to (belt + empty + belt) to aid with pulling things off the belt cleanly
      • Iron Ingot
      • Copper Ingot
      • Iron Frame
      • Copper Frame
      • Iron Component
      • Copper Wire
      • Mechanical Component
      • Copper Component
      • Plantmatter Frame
      • Processor Unit
      • Relay Circuit
    • Pulled items should head to a storage buffer, then an Assembler. Because space is at a premium, build the Assemblers just far enough apart to have dedicated input lanes. If a product has 2 inputs, then you need : belt, belt, inserter, assembler (2 spaces), inserter, belt. That’s 7 spaces.
    • When you hit the end of the floor, build stairs going up that are 6 high, and then attach a floor to them. This will transfer power to the next floor and give enough space to run belts on the ceiling if need be.
    • Generally, you only need to store 1 stack of any given item that is NOT going onto the belt (e.g. crank wheels). Any item that is going on the stack, you want to store overflow (have the same quality inserter putting things in, and putting things out).
    • Some items should not be put on the belt as they are only used in 1 other step. Either belt them through the back, or build the assemblers next to each other.

My first floor of of the factory was dedicated to intermediate materials to fill up the belt. My second floor was logistics buildings, since Inserters have cross-dependencies. Third floor was more advanced items where Relay Circuits are finally added.

You will have some weird spaghetti for item upgrades, as you need the base item. Belts, Assemblers, Miners, Smelters, Threshers will need the base materials added from the back. When you get Mk2 Assemblers in a limited quantity, prioritize the production chain to make Mk2 Assemblers, then work from the bottom up as quadrupling the base item has compound benefits at the end.

A floor of the main bus. Lots of belts! Assemblers on one side, and vertical belts to move to the next floor.

Mining Bits + Research

This needs special consideration, as you likely only want to have 1 Assembler per mining bit tier, as you only consume half the output for the next rank. Mk1 bits produce at 10/min. Mk2 only needs 4/min input. You likely won’t create Mk4 bits until much later in the game, and then chain them into Mk5, 6, and 7. Mk7 bits generate at 1/minute and dig 2500m. As long as this is going 100% of the time, you will unlock each floor without thinking about it.

Research can be a pain. Red creates 30, Blue uses 30 to create 10, Green uses 9 (?) to create 3. This is a pain because the requirements of research are inversely proportionate. You may only need 15 red to unlock something but you need 300 green to unlock another. I’d strongly recommend having 2 Assemblers per research core. More than that will not be sustainable. Once you unlock Crushers, you can make a dedicated area for research, it’s too complicated until you can use gold.

Final Note

When you unlock Blast Miners and slabs, you’ll want to use those instead to create raw materials as it’s quite a bit more effective. The factory itself can remain as is. Late game with Crushers, you’ll find different ways to make things with slabs, at that point it may be worth rebuilding the entire factory proper to be more efficient.

Techtonica 1.0 – Day 1 (ish)

I gave it a good go and came away with some interesting thoughts.

  • The early game stuff from EA is still here. Lima is floor 1, which is effectively the tutorial.
  • Floor 2 is Victor, which in the EA was the main base location. That appears to still be the case, given that this floor has Iron, Copper, and Limestone. I’ve got a multi-story factory once again.
  • The balance of Iron/Copper remains a challenge. You’ll seemingly never have enough Iron until quite a bit into the game.
  • Biobricks and routing to the 3 mining areas remains a priority.
  • The tweaks to the Planter/Thresher production cycle are less intuitive. Instead of collecting seeds, you collect material that is Threshed into seeds. The lack of a UI that explains this (Thresher UI doesn’t populate until you put stuff in it) is going to be a hurdle for some.
  • Research appears to have been balanced, including very early access to a fuel-free jetpack.
  • Making foundations takes way too many materials, in particular limestone. By a factor of 10. This means you need to explore for chests to find materials.
  • It becomes clear very quickly that you do not want to craft anything by hand if you can avoid it, Mk1 craft double the rate, Mk2 quad. The game is balanced around the latter.
  • Floor 3 has some research unlocks for Planters/Threshers. It takes ~20 mining bits to unlock. Better done sooner than later.
  • Floor 4 is the Hydro floor, which was a mid-game unlock in EA. Water Wheels. Should be a race to get here honestly, as they make a world of difference.

So far, it’s been rather similar to the EA experience, with the exception of automating floor construction, which is much more difficult. The main difference so far is the need to craft Mining Bits, which are, well, an interesting mechanic.

In the simplest of terms, Mining Bits are a time-gating mechanic. The elevator has 2 inputs for mining bits, at 4/minute. As you dig further, the bits become less effective. Automating construction of these is key, as they are slow to build and slow to dig.

So far I consider the experience improved.