
I’ve spent so much time talking about design that I’ve missed sharing the key principle in it all, which is oddly relevant today – logistics. Specifically, the act of moving things from one place to another, in the right amounts, at the right time. It sounds simple, but logistics is how actual wars are won. I will try to simplify that down.
Also check my post on Space Logistics
Important note that of all the factory games I have played, Factorio is by far the most robust/complex. I’m of the growing opinion that graduating engineers should be forced to play this game, it’s that complete.
Concepts
Moving things from one place to another. Easy right? Sort of.
- You need to know where things are, how to get to them, how much you need, and then move those things to your transport vehicle.
- Your vehicle needs a path, fuel, storage, and travel time to reach a destination.
- Your destination needs the ability to store said items, and how much it needs. It should not store things it doesn’t need.
If I want to ship aluminum powder across the ocean, I need trucks to get to the supplier, then to the docks, onto a ship, to another dock, then a truck again, to the receiver. That takes weeks to complete, so the receiver places the order well ahead of time. In a war, think guns + ammo.
If I want to eat a banana, I go to the grocery store. Bananas don’t grow in Canada, so again, farmers, trucks, distribution centers, grocery stores. That takes a few weeks, so the bananas have to be collected before being ripe, and have to be placed in the small timeframe before they go rotten. Perishable goods are extremely time sensitive. In a war, think food or people.
Tools
Factorio has a lot of tools to help here.
- Belts. Simple enough, they move things at a given speed across a map. They can be split or merged. A belt is saturated when it’s full.
- Pipes. Similar to belts, the move liquids across a map. They have a maximum distance before needing a pump. They have no throughput limits (which is a BIG deal on Vulcanus).
- Trains. Bulk belts with schedules. You often don’t think you need them, and then you realize you absolutely do, and have to tear half your factory apart. Trains require blueprints for you to stay sane. At ultra late game levels, they are the only solution to landing pad throughput issues. I won’t detail much here, they aren’t as useful as they were in vanilla.
- Logistic Robots. Can carry a maximum of 4 items, and their speed can be upgraded infinitely. Used to move things between lading pads + logistic chests. They need a Roboport to function (yellow to move items, green range to build things). Roboports can, if connected, read the logistics network.
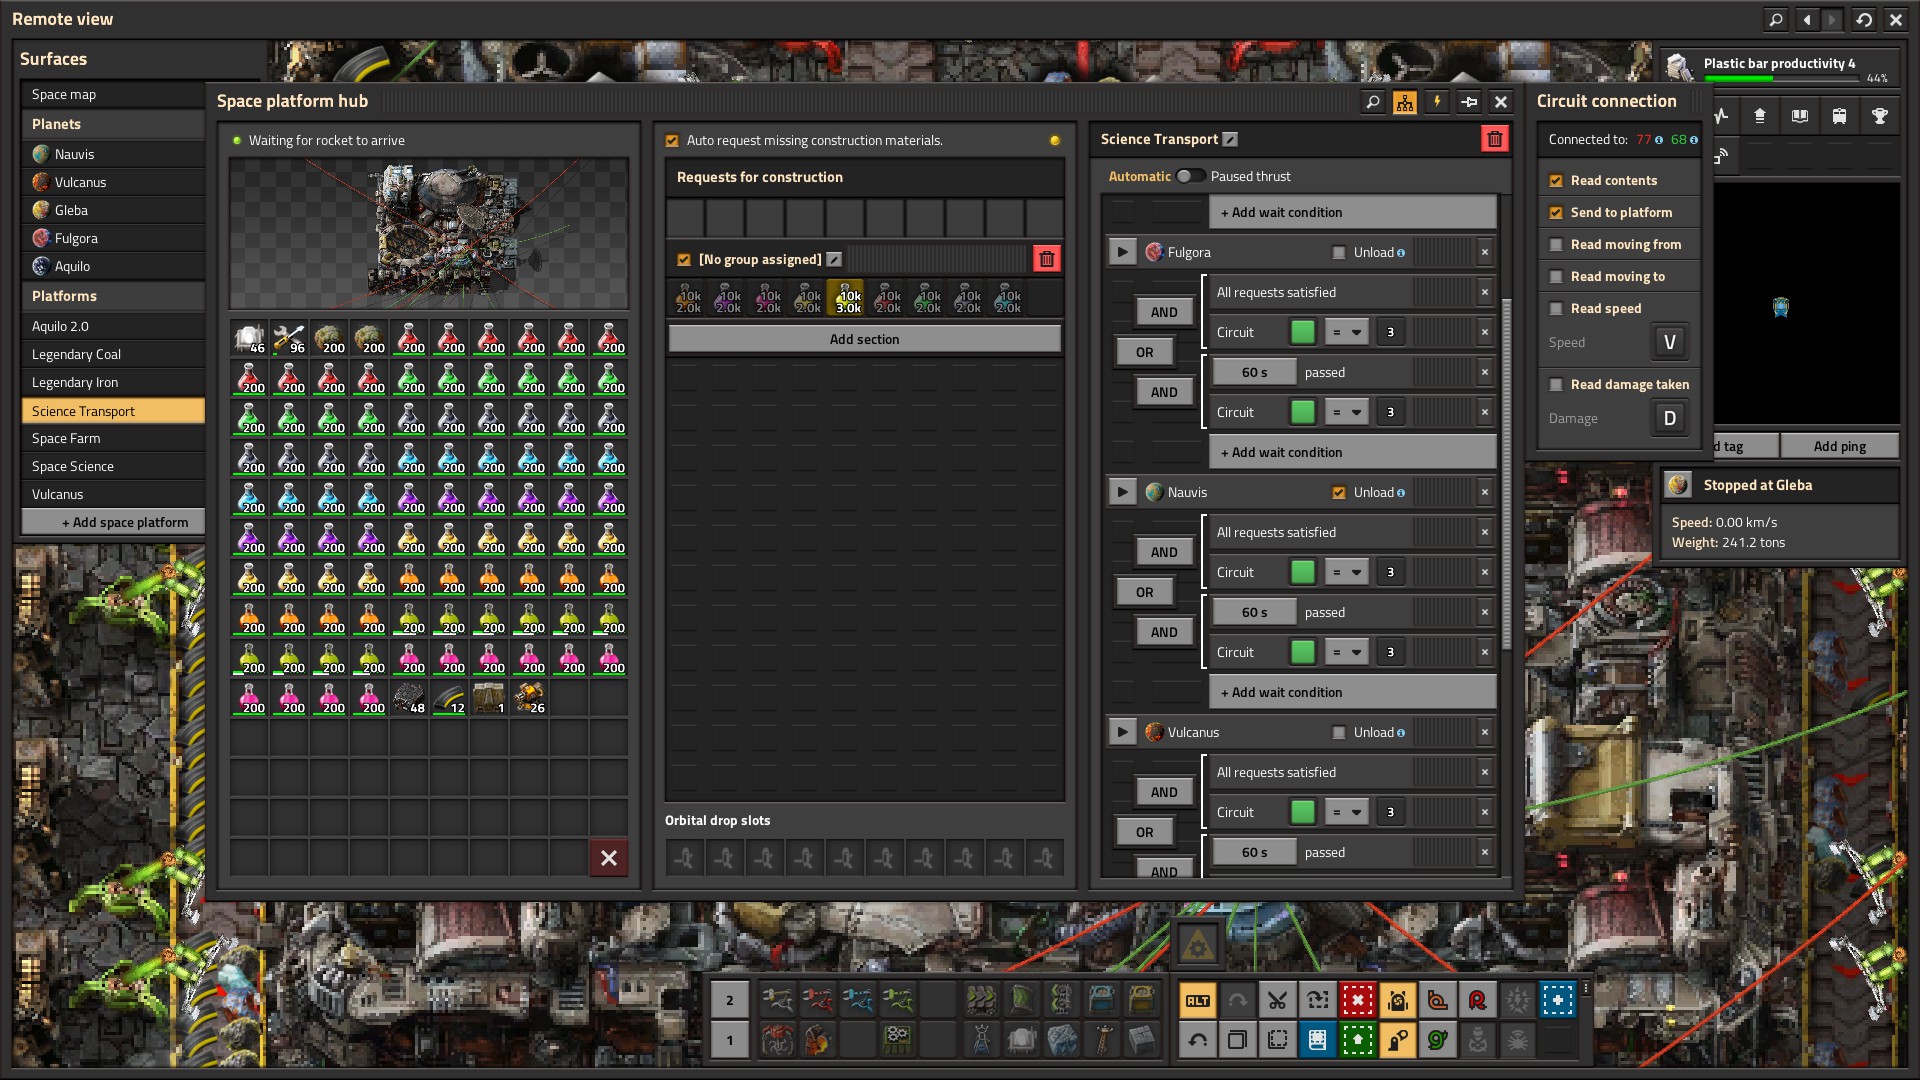
- Space Platforms. A combination of a train and Logistic Robots between planets. Train in that it’s scheduled, Robots in that you can select specific items.
- Logistic Network. A planet’s interconnected system of logistic containers. Only items in specific storage count – colored chests + the landing pad. Items in transit or on you don’t count.
- Circuit Network. Math and logic tools that set conditions for the network to function.
Colored Chests
There are bunch of options for logistic chests, each with a color and a purpose. Some you will use a lot, others barely.
- Active (purple). You can only put things in manually or with an inserter. The chest will automatically request itself to be emptied. Extremely useful on Gleba (as things spoil) or to keep a landing pad empty.
- Passive (red). You can only put things in manually or with an inserter. The chest acts as storage. Ensures that robots never put anything inside. Useful for storing multiple items, or to avoid having to filter a yellow chest.
- Storage (yellow). Can be accessed by anything, for storage and removal. 90% of your chests are this type. Can only filter for a single item. Useful to put 20 or so near a landing pad so that the purple chest can dump into here.
- Requester (blue). Requests items from the network so that robots find them. Items in blue chests cannot be removed by robots. Items in blue chests do not count to the logistics network. Extremely useful to construct complex buildings in late game instead of belt weaving.
- Buffer (green). You set requests, which will then feed other parts. I have found zero cases where this is useful, certainly not with Space Age.
Circuit Network
These tools are math based, and can be used in a variety of methods to present decision points for a logistics network.
- Constant Combinator. A tool that has a fixed set of items listed, sometimes in groups. If you always want to have 200 red belts, you set it here. Has no inputs, and 2 outputs.
- Arithmetic Combinator. A tool that performs basic math functions (+ – / *) on a given set of inputs.
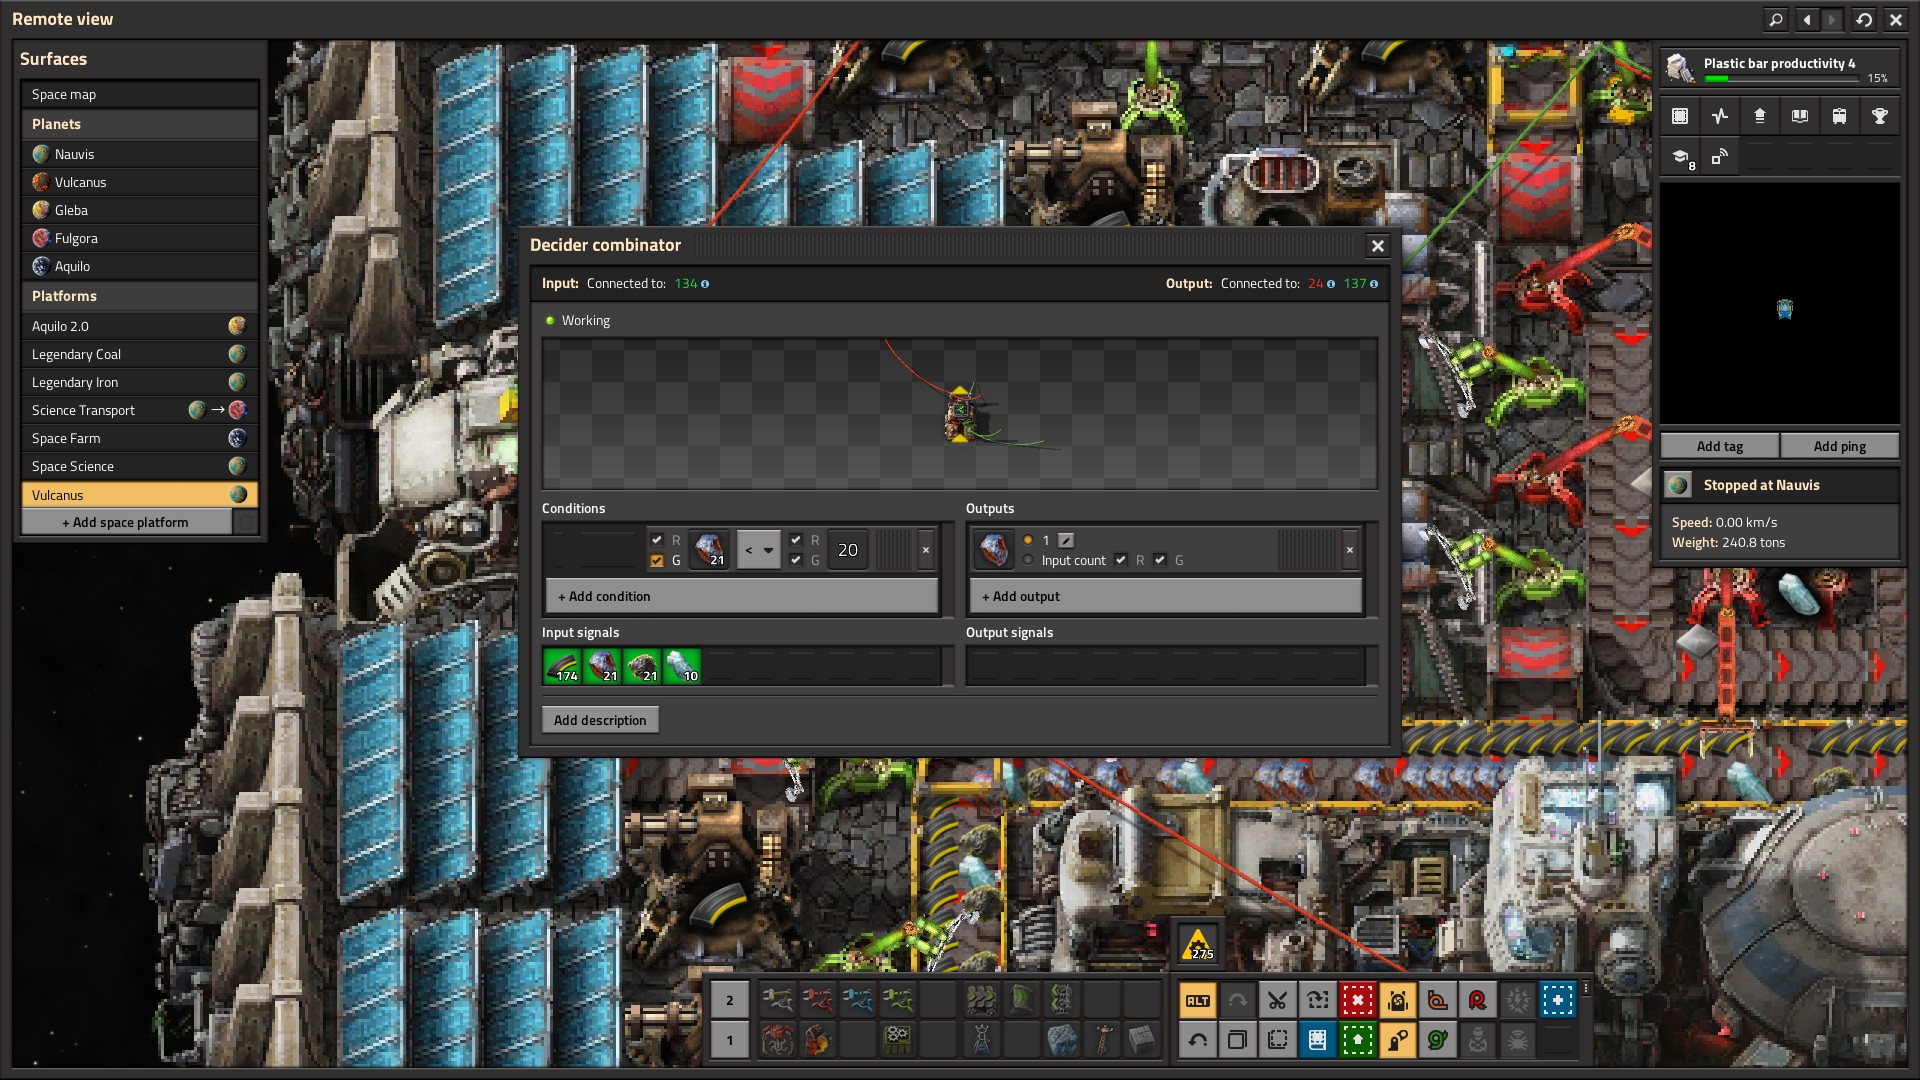
- Decider Combinator. A tool that compares inputs and provides an output. If something is larger, or the same, or a threshold has passed. Has 2 inputs and 2 outputs.
- Selector Combinator. Think of it as a filter. This thing has very niche uses and not worth exploring until you understand the first 3.
- Wires. Used to connect things. The color matters (red/green) as your inputs are color specific. You can connect to nearly all items in the game, including belts (to read all material). It transmits the math.
Simple Setup
When you start the game, you’re extremely resource starved. You only want to build what you need and no more. The simple circuit can help!
- This assumes that you have Assemblers that are putting their material into storage containers.
- The Assemblers are all connected to power poles through a colored wire (let’s say red for now), building a connected network.
- All the chests (wood or steel) are connected to power poles through a different wire (let’s say green).
- A Constant Combinator that has a list of the maximum amount you want, per item constructed. (let’s say 300 yellow belts).
- An Arithmetic Combinator. One input is from the Constant Combinator (red wire), the other is from the chest network (green wire).
- The math would be Red (what you want) – Green (what you have). The output would be a red wire to the assembler network.
- If you have too much, the number is negative. If you have too little, the number is positive.
- Each Assembler is configured on the network so that it is enabled when the item being produced as a positive number.
- The end result is that each Assembler will only produce and store what you need, and automatically stop past that.
You can evolve this with logistics networks with colored chests + connecting to a Roboport to read all the chests automatically (replaces the original green wire network).

Decider Setup
Taking the example above and moving into a Logistics network. I find this required for space travel.
- Constant Combinator with what you need to keep a base running, as well as rocket ship parts. This includes pipes, inserters, assemblers, plastic, LDS, and so on. See image as an example. Also good to have this set up as a demand on Space Platforms.
- Arithmetic Combinator comparing the logistics network to the Constant.
- The challenge is that the network is always under change as you produce items. Green belts are made on Vulcanus, and you ideally never want to request them from a Space Platform.
- A Decider Combinator that filters the demand so that only items that need >5 items are actually requested. It is important that the lowest value on the Constant Combinator is higher than the Decider value.
- Connect the Decide to the Landing Pad, set it to Request Items
- A stack/bulk inserter connected from the landing pad to a purple chest, with 20 yellow chests next to the pad.

Space Platform Deciders
Space chunks are full of RNG, and it’s entirely possible to saturate your Space Platform with too much of a useless material. This is extra painful on Aquilo where 80% of the chunks are Oxide and you really want Carbon. There are a few ways to manage this.
- Read all the contents on a belt through a connected wire.
- Constant Combinator that has the maximum amount of a given type of chunk (all 3 combined should be ~80% of a total belt capacity). You can also manually set this in the next step.
- Decider Combinator, per chunk type, that evaluates if you have less than the maximum. If so, output the chunk type. (so if you have less than say 20 Oxide chunks, request Oxide chunks)
- Connect the result to the Collector network, using the filter option. If you need more, then it will filter to collect, else it will skip.
Fuel/Ammo Deciders can be used to set ship launch conditions. Same concept, read each item, compare it to a set value, and output a signal. If all signals are good, then launch the ship. On basic planet routes, that’s 12k fuel (each type) and 150 regular ammo. Aquilo is 20k fuel, 400 regular ammo, and 300 rocket ammo. Super simple and easy to maintain.

If you have the room to recycle chunks, you can use combinators to evaluate if you have too much of one type and not enough of an other, then recycle it. Aquilo needs this. If I have over 80 Oxide and less than 20 Carbon OR over 80 Oxide and less than 10 Metallic… recycle.

When you get the concepts of logistics, you realize that the game has so much more to offer that just filling boxes. Impressive the flexibility that math tools can provide.
